In this article we will show 3proxy configuration on a dedicated server powered by the ArchLinux/CentOS operating system. 3proxy is one of the most relevant and functional tools. It supports various types of protocols: HTTP, HTTPS, FTP, SOCKS, and others. It will help you to set up your own proxy server in a matter of minutes.
The article contains step-by-step guidance on the utility installation and its further configuration. Issues such as installation from an official source, setting up configuration files, opening non-standard ports are considered, as well as common errors are described and practical recommendations for solving them are given. Before launch, you must order a VPS or dedicated server powered by the CentOS or ArchLinux operating system. All actions in the example will be performed on a dedicated server powered by the CentOS7 operating system with one dedicated static public IP address.
Installation
Step 1
3proxy is installed directly from the sources. gcc will be used as the compiler. We connect to the server as root (superuser) and install the compiler.
yum install gccStep 2
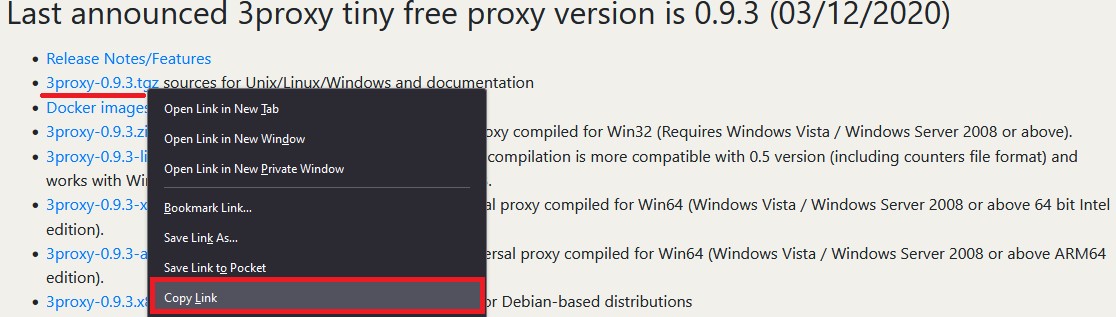
Now it’s necessary to download the 3proxy source files. You can do this by going to the official website and copying the link to the current version:
If an archived version is needed, you may also download the link directly from GitHub:

At the time of writing this article, the current version is 0.9.3. Download it and immediately unpack it:
wget https://github.com/z3APA3A/3proxy/archive/0.9.3.tar.gz
tar -xvzf 0.9.3.tar.gz
Step 3
Go to the directory with the unpacked project and compile:
cd 3proxy-0.9.3/
make -f Makefile.Linux
Step 4
We create directories and copy the 3proxy file to /usr/bin:
mkdir -p /var/log/3proxy
mkdir /etc/3proxy
cp bin/3proxy /usr/bin/
Step 5
We create a user to work with the catalog. In this case the username is 3proxyuser:
useradd -s /usr/sbin/nologin -U -M -r 3proxyuserWe grant the rights to work with directories to the created user:
chown -R 3proxyuser:3proxyuser /etc/3proxy
chown -R 3proxyuser:3proxyuser /var/log/3proxy
chown -R 3proxyuser:3proxyuser /usr/bin/3proxy
Now let’s create a configuration file using the command:
touch /etc/3proxy/3proxy.cfgIf necessary, you may set permissions on the configuration file for the root user. This step is not obligatory, but will add protection:
chmod 600 /etc/3proxy/3proxy.cfg3proxy configuration
Step 6
It is necessary to correctly fill out the configuration file that was created earlier. First, find out the uid and gid of the user by the command:
id 3proxyuserIn our case these are the following values:

To fill out the configuration file, you may take ready-made configurations or use the documentation on the official website. Also a file with an example is already preinstalled by default; you can find it along the path: /cfg/3proxy.cfg.sample
As an example, we will consider 2 types of configuration: with and without logging. Each line will be accompanied by comments (they are marked with the “#” symbol).
This is an example of a ready-made config without logging:
# We specify the user's data that we found out in the previous command
setgid 995
setuid 997

# Type the NS-servers. It is possible to clarify your own servers at /etc/resolv.conf
nserver 1.1.1.1
nserver 8.8.8.8

# Cache size
nscache 65536

# Timeouts
timeouts 1 5 30 60 180 1800 15 60

# Authorization of users by login/password (if required). You may not to use it or specify the path to the file in which authorization data is stored, for example, users $/etc/3proxy/.authfile

# If you insert a password in md5 format, replace “CL” with “CR”, as indicated in the example. You can use 2 methods at the same time.
auth cache strong
users "userproxy:CL:passwordproxy"
users "userproxy2:CR:b89097a7ad0b94f13b3c313ae76699d4 "

# Launch mode. Daemon only.
Daemon

# We write the port through which the http connection will take place. The example shows the standard one. To establish a socks connection, use the command specified in the second line, the port is also standard.
proxy -p3128
socks -p1080
We considered the option of a configuration file without logging. Now we will create a configuration file with logging and user authorization; it will be used later during the server setup.
Make sure that you provide authorization information, as the server can be detected even on non-standard ports.
# Configuring the server to launch from the userproxy user and the passwordproxy password.
users userproxy:CL:passwordproxy

# Specify the user's uid and gid
setgid 995
setuid 997

# Nameservers (NS-servers)
nserver 1.1.1.1
nserver 8.8.8.8

# Timeouts
timeouts 1 5 30 60 180 1800 15 60

# Cache size (standard)
nscache 65536

# Indicate the launch mode
daemon

# We install http proxy on a non-standard 50001 port. If there are several IP addresses on the server, be sure to specify a specific address for connecting the network. For example, "-e91.150.32.146". The argument "i" is a local address.
proxy –p50001

# In a same way as socks proxy, we conduct the installation on a 50002 port.
socks –p50002

# Path to the directory with logs, logs format and proxy rotation
Log /var/log/3proxy/3proxy.log D
logformat "- +_L%t.%. %N.%p %E %U %C:%c %R:%r %O %I %h %T"
rotate 30
This completes the setup of the main configuration file. We move on to the final stage and launch.
Step 7
Create an initialization file for systemd:
touch /etc/systemd/system/3proxy.serviceIssue the necessary rights:
chmod 664 /etc/systemd/system/3proxy.serviceCopy and paste the following values into the file and save:
[Unit]
Description=3proxy Proxy Server
After=network.target
[Service]
Type=simple
ExecStart=/usr/bin/3proxy /etc/3proxy/3proxy.cfg
ExecStop=/bin/kill `/usr/bin/pgrep 3proxyuser`
RemainAfterExit=yes
Restart=on-failure
[Install]
WantedBy=multi-user.target»
Please note: in the “ExecStop” value you must specify the username that was created in step No. 5.
After which you need to update the Daemon configuration with the command:
systemctl daemon-reloadStep 8
The only we need is to launch the configured 3proxy, add it to autostart, and also open ports in the firewall.
Add it to autostart, launch and check status:
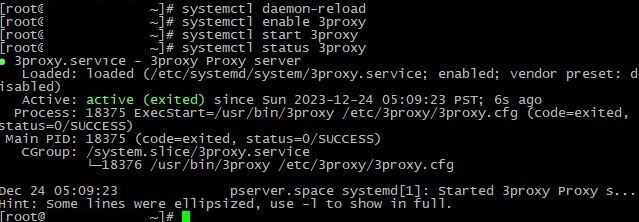
systemctl enable 3proxy
systemctl start 3proxy
systemctl status 3proxy
After checking the status, we see information that 3proxy has been launched successfully:
The only thing left is to open ports:
firewall-cmd --zone=public --add-port=50001/tcp
firewall-cmd --zone=public --add-port=50002/tcp
firewall-cmd –reload
If necessary, reboot the server. It is possible to check whether the ports are open with the command:
firewall-cmd --list-allWhat should be:
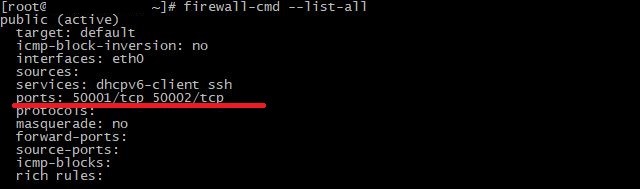
As we can see, both ports have been successfully opened and are being listened. http connection is on the first port, socks is on the second port.
Check the connection through any convenient service:

Everything is operating. For our part, we do not recommend using an unsecured connection without login/password authorization, as well as with a standard set of ports. While setting up the configuration file, be sure to specify a login and create a complex password, and also change the ports to non-standard ones. In exceptional cases, it is possible to use IP address authorization
Common problems
Something went wrong and the proxy isn't working? Perhaps the 3proxy configuration was done incorrectly. Let's consider the most common problems and their solutions during installing and configuring the utility.
No connection
The most common problem for many users is an inaccessible connection when the configuration files seem to be configured correctly. If you are sure that all the settings have been configured correctly, the hosting provider does not limit the selected port and all data indicates a working service, the problem may be in the Firewall, or, more precisely, its incorrect configuration. For example, there may be more than two programs installed on the system that will conflict with each other. To solve the problem, it is enough to use one specific Firewall. We advise you to select only iptables or firewall-cmd.
The service does not launch
The service does not start after setting up all the necessary configuration files. This occurs when a configuration step is missed, the appropriate rights are not given, or a minor error is made in the configuration files. We recommend you to carefully study the instructions step by step again, perhaps you missed one of the steps. If nothing helps, it would be a good idea to reinstall the OS and follow all the steps from the beginning. We recommend using sample located at /cfg/3proxy.cfg.sample, as a test configuration, and the pre-installed firewall-cmd as a firewall.
Logging
The final, but no less important issue relates to file storage. 3proxy takes several mb during installation, but the size can be increased significantly only through logging with the passing of time. The fact is that many users enable log recording in a separate file, but do not set up rotation and do not delete irrelevant logs. Three options can be used for solution of this problem:
- Enable logging;
- Periodically delete irrelevant logs;
- Enable rotation, as was done in the configuration above. For example, "rotate 30" in the configuration file means that 3proxy will only store the latest 30 files.
Conclusion
Installing and configuring 3proxy on CentOS and ArchLinux operating systems is a fairly simple, but at the same time effective task. The article covered the steps to install the necessary packages, configure configuration files, and launch the service. The knowledge gained will allow you to install and configure your proxy server yourself without any difficulties.