In this article, we will examine the key role of the robots.txt file in managing traffic on websites, discuss the necessity of its presence, and provide recommendations for setting it up for effective page indexing management. Additionally, we will analyze examples of correct directives usage in the robots.txt file and provide a guide on how to check the correctness of its settings.
Why Robots.txt is Needed
Robots.txt is a file located on the site's server in its root directory. It informs search engine robots how they should scan the content of the resource. Proper use of this file helps prevent the indexing of unwanted pages, protects confidential data, and can improve the efficiency of SEO optimization and visibility of the site in search results. The configuration of robots.txt is done through directives, which we will look at further.
Setting Directives in Robots.txt
User-Agent
The primary directive is known as User-Agent, where we set a special keyword for robots. Upon detecting this word, the robot understands that the rule is intended specifically for it.
Consider an example of using User-Agent in the robots.txt file:
User-Agent: *
Disallow: /private/
This example indicates that all search robots (represented by the symbol "*") should ignore pages located in the /private/ directory.
Here's how the instruction looks for specific search robots:
User-Agent: Googlebot
Disallow: /admin/

User-Agent: Bingbot
Disallow: /private/
In this case, the Googlebot search robot should ignore pages in the /admin/ directory, while Bingbot should ignore pages in the /private/ directory.
Disallow
Disallow tells search robots which URLs to skip or not index on the website. This directive is useful when you want to hide sensitive data or low-quality content pages from being indexed by search engines. If the robots.txt file contains the entry Disallow: /directory/, then robots will be denied access to the contents of the specified directory. For example,
User-agent: *
Disallow: /admin/
This value indicates that all robots should ignore URLs starting with /admin/. To block the entire site from being indexed by any robots, set the root directory as a rule:
User-agent: *
Disallow: /
Allow
The "Allow" value acts opposite to "Disallow": it permits search robots access to a specific page or directory, even if other directives in the robots.txt file prohibit access to it.
Consider an example:
User-agent: *
Disallow: /admin/
Allow: /admin/login.html
In this example, it is specified that robots are not allowed access to the /admin/ directory, except for the /admin/login.html page, which is available for indexing and scanning.
Robots.txt and Sitemap
Sitemap is an XML file that contains a list of URLs of all pages and files on the site that can be indexed by search engines. When a search robot accesses the robots.txt file and sees a link to a sitemap XML file, it can use this file to find all available URLs and resources on the site. The directive is specified in the format:
Sitemap: https://yoursite.com/filesitemap.xmlThis rule is usually placed at the end of the document without being tied to a specific User-Agent and is processed by all robots without exception. If the site owner does not use sitemap.xml, it is not necessary to add the rule.
Examples of Configured Robots.txt
Setting up Robots.txt for WordPress
In this section, we will consider a ready-made configuration for WordPress. We will explore blocking access to confidential data and allowing access to the main pages.
As a ready solution, you can use the following code:
User-agent: *
# Block access to files containing confidential data
Disallow: /cgi-bin
Disallow: /wp-admin/
Disallow: /wp-includes/
Disallow: /wp-content/plugins/
Disallow: /wp-content/themes/
Disallow: /wp-login.php
Disallow: /wp-register.php
Disallow: /xmlrpc.php

# Allow access to the main site pages
Allow: /wp-content/uploads/
Allow: /sitemap.xml
Allow: /feed/
Allow: /trackback/
Allow: /comments/feed/
Allow: /category/*/*
Allow: /tag/*

# Prohibit the indexing of old versions of posts and parameterized queries to avoid content duplication or suboptimal indexing.
Disallow: /*?*
Disallow: /?s=*
Disallow: /?p=*
Disallow: /?page_id=*
Disallow: /?cat=*
Disallow: /?tag=*

# Include the sitemap (location needs to be replaced with your own)
Sitemap: http://yourdomain.com/sitemap.xml
Although all directives are accompanied by comments, let's delve deeper into the conclusions.
- Robots will not index sensitive files and directories.
- At the same time, robots are allowed access to the main pages and resources of the site.
- ban is set on indexing old versions of posts and parameterized queries to prevent content duplication.
- The location of the sitemap is indicated for improved indexing.
Thus, we have considered a general example of a ready configuration, in which some sensitive files and paths are hidden from indexing, but the main directories are accessible.
Unlike many popular CMS or custom-written sites, WordPress has several plugins that facilitate the creation and management of the robots.txt file. One of the popular solutions for this purpose is Yoast SEO.
To install it, you need to:
- Go to the WordPress admin panel.
- In the "Plugins" section, select "Add New".
- Find the "Yoast SEO" plugin and install it.
- Activate the plugin.
To edit the robots.txt file, you need to:
- Go to the "SEO" section in the admin panel's side menu and select "General".
- Go to the "Tools" tab.
- Click on "Files". Here you will see various files, including robots.txt.
- Enter the necessary indexing rules according to your requirements.
- After making changes to the file, click the "Save changes to robots.txt" button.
Note that each robots.txt file setting for WordPress is unique and depends on the specific needs and features of the site. There is no universal template that would suit all resources without exception. However, this example and the use of plugins can significantly simplify the task.
Manual Setting of Robots.txt
Similarly, you can set up your configuration of the file even in the absence of a ready CMS for the site. The user also needs to upload the robots.txt file to the root directory of the site and specify the necessary rules. Here is one of the examples, in which all available directives are indicated:
User-agent: *
Disallow: /admin/             # Prohibit access to the administrative panel
Disallow: /secret.html	      # Prohibit access to a specific file
Disallow: /*.pdf$	      # Prohibit indexing of certain file types
Disallow: /*?sort=	      # Prohibit indexing of certain URL parameters
Allow: /public/		      # Allow access to public pages
Sitemap: http://yourdomain.com/sitemap.xml # Include the sitemap
How to Check the Robots.txt File
As an auxiliary tool when checking the robots.txt file for errors, it is recommended to use online services.
Consider the example of the Yandex Webmaster service. To check, you need to insert a link to your site in the corresponding field if the file is already uploaded to the server. After that, the tool itself will load the file configuration. There is also an option to enter the configuration manually:

Next, you need to request a check and wait for the results:
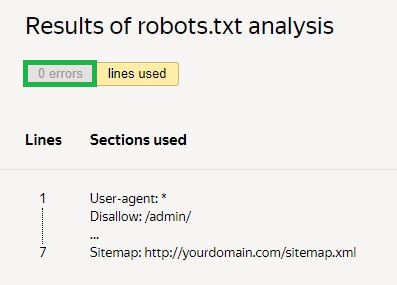
In the given example, there are no errors. If there are any, the service will show the problematic areas and ways to fix them.
Conclusion
In summary, we emphasized how important the robots.txt file is for controlling traffic on the site. We provided advice on how to properly set it up to manage how search engines index pages. In addition to this, we also looked at examples of how to correctly use this file and gave instructions on how to check that all settings are working correctly.