In this article, we will explore the process of installing and configuring Certbot on a Linux server. We will explain in detail how to obtain a Let’s Encrypt SSL/TLS certificate for your domain. We will also describe how to install it on a web server (such as Nginx or Apache) and set up automatic certificate renewals to ensure a continuous secure connection with your web resource.
Certbot is a free, open-source tool designed for the automatic acquisition and renewal of SSL/TLS certificates. It plays a crucial role in securing the connection between the server and the client, protecting data from unauthorized access. Certbot simplifies the installation and renewal process of an SSL certificate. Not only does the certificate enhance security, but it also boosts user trust in your web resource, thereby improving both the site's reputation and its search engine rankings.
Installing Certbot
Certbot is included in most distributions by default, so to install it on Debian/Ubuntu systems, you only need to update the package list:
apt updateThen, initiate the installation process:
apt install certbotCertbot supports plugins that facilitate the setup and configuration of the certificate for a web server. To install these plugins, use the corresponding command:
apt install certbot python3-certbot-nginx # for Nginx
apt install certbot python3-certbot-apache # for Apache
The installation process for Red Hat systems (such as RHEL, CentOS, Fedora) is slightly different. Initially, you need to add the EPEL repository:
yum install epel-releaseThen install the tool:
yum install certbotSimilarly, there is an option to select a plugin for a specific web server:
yum install python3-certbot-nginx # for Nginx
yum install python3-certbot-apache # for Apache
After installation, you can immediately proceed to obtain the certificate.
Obtaining an SSL Certificate
In this section, we will discuss the process of obtaining a certificate independently of a specific web server, followed by describing the process of installing the certificate for Nginx and Apache. However, it is essential first to understand the syntax and functionality of the program. It appears as follows:
certbot command option -d domainThe main commands include:
certbot certonly - Retrieves the certificate but does not install it.certbot certificates - This command displays a list of all installed certificates.certbot renew - Extends the existing certificate.certbot revoke - Revokes the existing certificate.certbot delete - Deletes the existing certificate.
The most commonly used options are:
--nginx - Uses Nginx configuration scripts for domain verification.--apache - Uses Apache configuration scripts for domain verification.-d - A list of domains for which the certificate is requested.--standalone - Uses standalone mode for domain verification.--manual - Performs manual domain verification.
This is just an example of the most frequent commands and options. You can familiarize yourself with the full list of program capabilities in the help section:
certbot –help
We now proceed to obtain the certificate. As an example, we will obtain a certificate for a virtual server for a free third-level domain like yourusername.pserver.space
First, you need to enter the command:
certbot certonlyIn response, the utility will ask you to choose a method for verifying domain ownership:
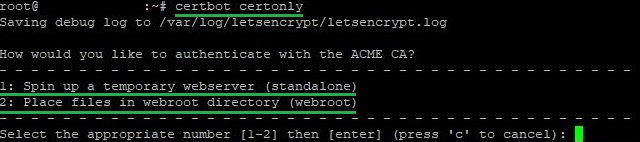
The first option is convenient if you do not have a configured web server or you do not want to make changes to an existing one. This method creates a temporary web server to confirm your right to the domain. It is ideal for a simple and quick setup. When choosing this method, it is important to keep port 80 free.
The second option is preferable if you already have a web server operating, and you want to use it to verify the right to the domain. Certbot places special files in a folder on your server, which are then checked by the certifying center.
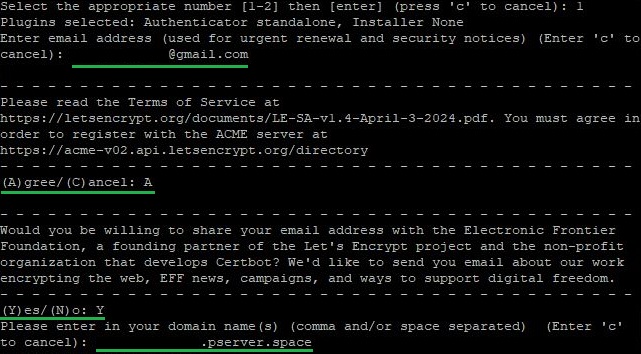
We choose the first option and click next. At this stage, you will need to:
- Enter an email address;
- Agree to the terms of service;
- Agree or refuse to receive emails on behalf of the company and its partners;
- Specify the domain name for which the certificate is issued.
After completing the certificate issuance process with the Certbot tool, it will indicate the path to the directory where the issued certificate and the data for your account are stored:
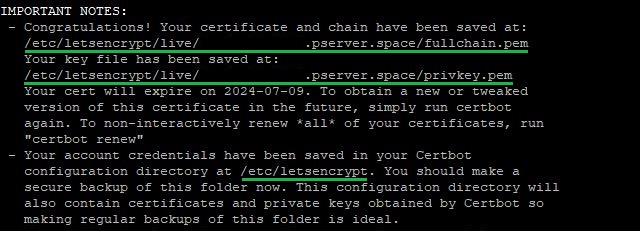
All that remains is for you to link the obtained certificate to the required service.
Installing the Certificate for Nginx or Apache
This section assumes that certain fundamental conditions have been met:
- You have already installed and configured a web server, either Nginx or Apache. It must be accessible from the internet via the domain name for which you intend to obtain the certificate;
- During the installation of the tool, you also installed a plugin for Nginx or Apache using the appropriate command;
- The firewall allows connections on ports 80 and 443. If these ports are closed to connections, the service will be unavailable for incoming connections. For more details on firewall operation, we discussed this in the article on setting up a firewall on Linux.
Once all conditions are satisfied, you can proceed directly to the certificate issuance. We will consider the process of obtaining an SSL certificate on a server using Nginx as an example. However, if you are using an Apache web server, the process is completely identical.
To obtain the certificate, you need to enter the command:
certbot --nginx # for Nginx
certbot --apache # for Apache
In response, the tool will request: an email address, consent to the terms of use of the Let's Encrypt service, and permission to send emails on behalf of the service and its partners.
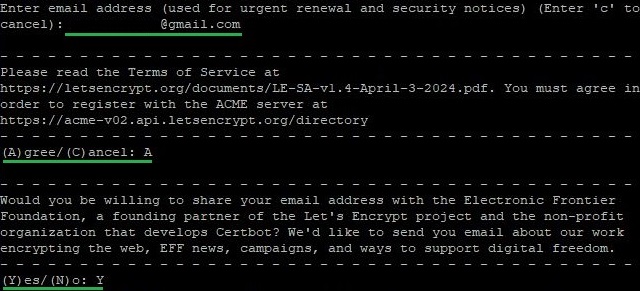
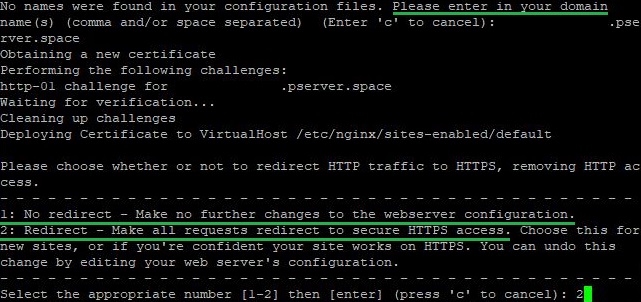
Following that, you will need to specify the domain name for which the certificate is issued. Certbot can automatically determine the domain if it was specified in the server_name field for Nginx configuration or ServerName and ServerAlias for Apache. If it is not specified, the program will notify you and ask you to enter the domain name manually. Then, the utility will ask whether to enable redirection of requests from HTTP to HTTPS protocol. To set up automatic redirection, you should choose the second option:
After some time, Certbot will inform you of the successful acquisition of the certificate for the specified domain. From this point forward, all incoming connections will be redirected from port 80 to 443. The tool will display the directories in which you can find all the certificate data and the Let’s Encrypt account details:
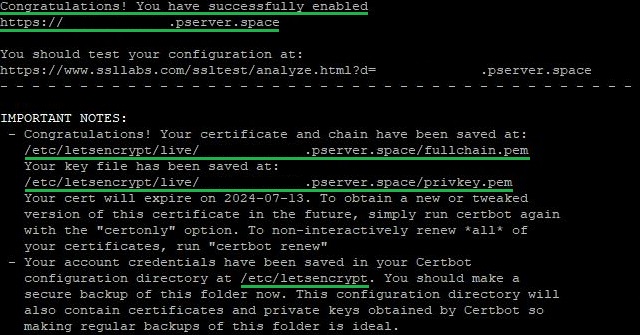
The message will also specify the validity period of the obtained certificate and important options for managing all active certificates:
- certonly. This option is used for obtaining or updating the certificate without automatic web server configuration. Certbot will only request or update the certificate but will not make any automatic changes to the server configuration. Previously, we used this option to obtain a certificate without being tied to a web server.
- renew is used for the automatic renewal of all certificates that have been obtained through Certbot and are within their validity period. The program will check all certificates, and if any of them expire within 30 days or less, it will be automatically renewed.
Next in the instructions, we will discuss how to set up the automatic renewal of certificates without user intervention every three months.
Automatic Certificate Renewal in Certbot
For Debian/Ubuntu
When using these operating systems, Certbot automatically adds a script to the task list for the automatic renewal of installed certificates. You can check the functionality of the script with the following command:
systemctl status certbot.timer
The response will display the status of the service, as well as the directory containing the configuration file. You can open this using any text editor. If you are not experienced with text editors in Linux, we recommend familiarizing yourself with our overview of the most popular solutions. In this case, we will use nano:
nano /lib/systemd/system/certbot.timer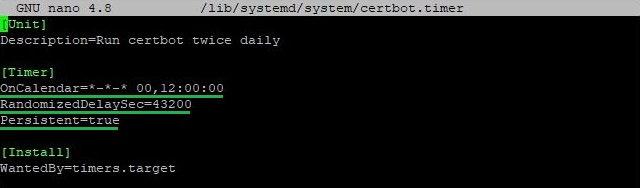
All the important parameters are highlighted:
- The schedule indicates that the service will run twice a day at 00:00 and 12:00;
- A second value indicates a random delay in seconds that will be added to the timer's start. In this case, it is 43,200 seconds (12 hours), which makes the launch more random and spreads the load;
- This parameter ensures that if the timer was supposed to be executed during a system shutdown, it will be activated immediately upon startup.
You can also run a forced check of certificate renewal with the command:
certbot renew --dry-runUsing this command, the certificates will not be updated. Instead, the tool will perform actions similar to obtaining a certificate upon its expiration. This way, you can ensure the service's functionality regarding automatic renewal.
For CentOS, Fedora, and others
The process of enabling automatic updates on Red Hat family systems differs slightly. Unlike Debian/Ubuntu, for CentOS and other systems, you need to manually add a task to the scheduler. For this, we will use the cron tool:
crontab -eThen, in the file that opens, add the following line:
0 12 * * * /usr/bin/certbot renew --quietLet’s break down the main arguments of the command:
- The execution time. In this case, the command will automatically run at 12:00 every day;
- The command to renew SSL/TLS certificates using Certbot;
- The --quiet flag suppresses output, making the process more hidden and less intrusive in system logs or display.
After adding the command, you need to save the changes in the file.
Just as with Debian/Ubuntu, you can also initiate a forced check of certificate renewals:
certbot renew --dry-runThe result of a successful execution of the command looks as follows:

Conclusion
We have explored the comprehensive process of installing and configuring Certbot on a Linux server. By following the provided instructions, you can successfully obtain an SSL/TLS certificate from Let's Encrypt, install it on your web server, and configure automatic renewal to ensure continuous protection and increased trust in your web resource. With Certbot, you can easily create a reliable and secure environment for users.