Firewall on Linux plays a vital role in securing a computer system. It acts as a barrier, controlling and filtering network traffic to protect the system from unauthorized access, attacks, and other threats. Without a properly configured Firewall, the server could be vulnerable to various types of cyberattacks, leading to serious consequences for data security and confidentiality.
In this article, we will look at two main tools for configuring the Linux Firewall: firewalld and iptables. We will conduct a comparative analysis of their features, functionality, and advantages. Additionally, we will provide detailed instructions for setting up and using each of these tools, as well as discuss best practices for securing your system with a Firewall on the Linux platform. All actions will be demonstrated on a virtual server with root access.
Configuring firewalld on Linux
Firewalld (Firewall Daemon) is a program for managing the firewall in Linux operating systems. It provides a user interface for configuring firewall rules, allowing or blocking connections of network applications. It is pre-installed by default in most server distributions. If Firewalld is not pre-installed, it can be installed independently from the distribution's official repositories.
For Red Hat systems (such as RHEL, CentOS, Fedora) the installation is performed with the command:
yum install firewalldFor Debian/Ubuntu:
apt-get install firewalldAfter installation, it can be started and activated immediately with the command:
systemctl start firewalldNext, you need to add the service to startup:
systemctl enable firewalld
At this point, we recommend disabling ufw, as the simultaneous use of this tool with firewalld or iptables is not recommended. Check the status:
systemctl status ufw
To stop it, enter the command:
systemctl stop ufwFor complete deactivation:
ufw disableAfter these actions, you can proceed to configure firewalld.
First, it's necessary to define trust zones. Firewalld uses the concept of zones to determine the level of trust for network interfaces. Each interface is assigned one zone, and firewall rules are applied based on the zone. The list of all available zones is opened with the command:
firewall-cmd --get-zonesTypically, 4 main zones are used:
- Public: This zone is for networks that you consider unsafe;
- Private: Applies to home networks or other trusted network connections;
- Internal: Used for internal networks, such as those within an organization or corporate network;
- DMZ: This zone is where servers are usually placed that should be accessible from the internet.
However, this is just one example. You can add your own zone using the command:
firewall-cmd --permanent --new-zone=nameyourzoneAfter adding, a reload is required:
firewall-cmd --reloadTo delete a zone, a similar method is used
firewall-cmd --permanent --delete-zone=nameyourzoneAfter defining zones, it's necessary to allow traffic for the needed services and ports. To allow a certain service, use the command:
firewall-cmd --zone=public --add-service=nameWhere name is the name of the service. For example, to allow traffic for Apache:
firewall-cmd --zone=public --add-service=httpTo define permissible ports, use the command:
firewall-cmd --zone=public --add-port=number/protocolFor example, the standard 22 port for SSH would look like this:
firewall-cmd --zone=public --add-port=22/tcpAt this stage, the main rules are already created. Next, determine how traffic will be processed depending on the source, destination, port, and other criteria. To add a rule (using the public zone as an example):
firewall-cmd --zone=public ruleFor example, to allow incoming traffic from any source to port 80 (HTTP):
firewall-cmd --zone=public --add-port=80/tcp --permanentTo remove a rule:
firewall-cmd --permanent --remove-rule=rule_specificationWhere rule is the type of rule (e.g., port, service, rich-rule, etc.), and rule_specification is the specification of the rule itself.
After making changes to the Firewalld configuration, it's necessary to save and apply them. To save changes, use the command:
firewall-cmd --runtime-to-permanentTo apply changes:
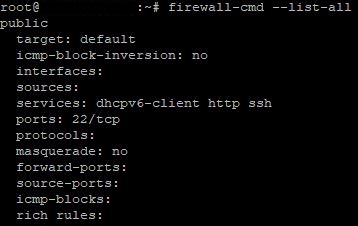
firewall-cmd --reloadUpon completing the setup, you can verify the selected parameters by opening the list of all rules:
firewall-cmd --list-all
If any problems arise, check the Firewalld logs with the command:
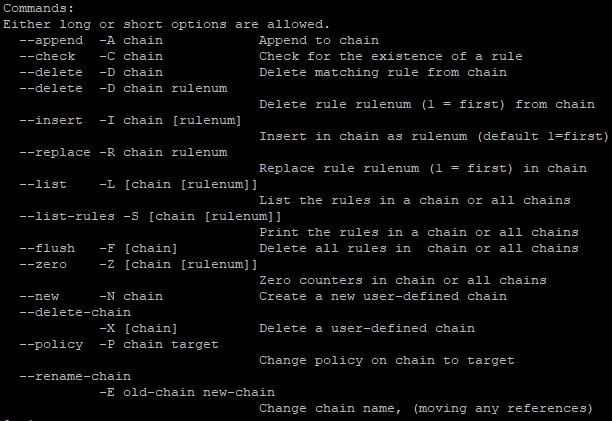
journalctl -u firewalldNote: We've only covered the general algorithm for setting up the connection. The tool has extensive functionality. For full information on all available options, you can use the official documentation or open help:
firewall-cmd --helpConfiguring iptables on Linux
Unlike Firewalld, iptables is an older but still widely used tool in Linux for managing the firewall. It provides a more direct and flexible approach to packet filtering rules at the Linux kernel level. However, iptables requires more advanced knowledge and experience compared to Firewalld, making it less accessible for beginners. Check the pre-installed version of the tool with the command:
iptables -VIf the tool is not installed, it will need to be installed. The command for installation on Ubuntu, Debian:
apt install iptablesFor Red Hat systems (e.g., CentOS, Fedora):
yum install iptablesThe command for activation after installation:
systemctl start iptablesTo add to startup, execute:
systemctl enable iptablesBefore starting the iptables configuration, it's important to understand how it works. This is helped by the syntax of the program. It looks as follows:
iptables -t table action chain additional_parametersLet's delve deeper into each item.
Iptables has four main tables: filter, nat, mangle, and raw. Each is designed for processing certain types of packets and has its own chains of rules:
- filter: This is the most frequently used table, containing packet filtering rules. It's used for making decisions on whether to allow or deny packets.
- nat: This table is used for modifying network addresses and ports in packets. It's often used for setting up masquerading (NAT).
- mangle: In this table, you can modify packet headers. It's used for specialized packet operations, such as marking.
- raw: This table is used for configuring rules that apply before they go through the connection tracking system. It's typically used for setting up rules that should not be modified by the tracking system, such as dropping packets from certain addresses.
Each table contains a set of chains. Chains are a sequence of rules that are checked sequentially. There are three predefined chains:
- INPUT (incoming). The rules in this chain determine what to do with incoming packets.
- OUTPUT (outgoing). This chain applies to all packets your computer sends to other devices or computers on the network.
- FORWARD (forwarding). The rules in this chain specify what to do with forwarded packets.
Finally, each chain possesses some action (target). In practice, 5 main actions are used:
- ACCEPT: Allow the packet to pass through the firewall.
- DROP: Reject the packet and discard it without any response.
- REJECT: Reject the packet and send the sender an ICMP error message.
- LOG: Log the packet in the system log and perform another action (e.g., ACCEPT or DROP).
- RETURN: Stop checking the rules in the current chain and return to the calling chain (if applicable).
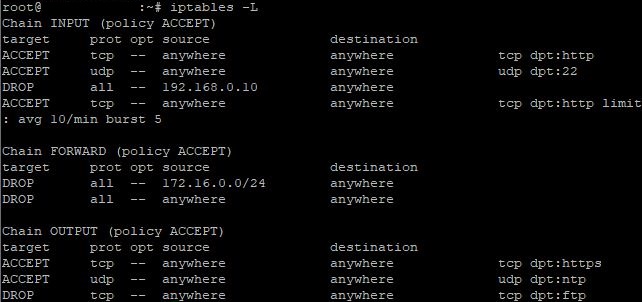
To start the setup, open the list of existing rules with the command:
iptables -L
As a guide for configuring Iptables, let's look at practical examples of the most commonly used commands. For convenience, we'll divide the examples into 3 groups, depending on the specific chain.
Chain INPUT:
- Allow incoming traffic via TCP protocol on port 80:
iptables -A INPUT -p tcp --dport 80 -j ACCEPT2. Allow incoming traffic via UDP protocol on port 22:
iptables -A INPUT -p udp --dport 22 -j ACCEPT3. Block incoming traffic from a specific IP address:
iptables -A INPUT -s 192.168.1.100 -j DROPChain OUTPUT:
- Allow outgoing traffic via TCP protocol on port 443:
iptables -A OUTPUT -p tcp --dport 443 -j ACCEPT2. Allow outgoing traffic via UDP protocol on port 80:
iptables -A OUTPUT -p udp --dport 80 -j ACCEPT3. Block outgoing traffic to a specific port (for example, 21):
iptables -A OUTPUT -p tcp --dport 21 -j DROPChain FORWARD:
- Block forwarded traffic from a specific range of IP addresses:
iptables -A FORWARD -s 172.16.0.0/24 -j DROP2. Block the forwarding of packets from a specific network interface:
iptables -A FORWARD -i eth1 -j DROP3. Limit the number of simultaneous connections for a specific port (in this example, 10 connections per minute on port 80):
iptables -A INPUT -p tcp --dport 80 -m limit --limit 10/minute -j ACCEPTAs you can see, in each separate case, an additional argument (command) is used. To get a full list of possible arguments and overall support for the tool's functionality, enter:
iptables -h
To ensure the settings are correct, re-enter the command to view the list of rules:
iptables -L
To delete a specific rule, use the command:
iptables -D chain rule_numberFor example, if you want to delete rule number 1 from the INPUT chain, the command will look like this:
iptables -D INPUT 1To delete all rules with one command:
iptables -FImportant note: iptables rules are not saved automatically after rebooting the system or service. To save the rules, they need to be added to a configuration file and restored after reboot. The iptables-save and iptables-restore utilities can help with this. To save the rules, enter the command:
iptables-save > /etc/iptables/rules.v4This saves the current iptables rules in the rules.v4 file. To restore after reboot, enter:
iptables-restore < /etc/iptables/rules.v4This command restores the rules from the rules.v4 file.
Conclusion
Configuring Firewall on Linux using firewalld or iptables is an important aspect of ensuring server security. Both tools offer reliable means of managing network traffic and protecting the system from unauthorized access and cyberattacks. The choice between firewalld and iptables depends on the specific needs and preferences of the user, considering their different functionality and strengths.