在本文中,我们将展示由 ArchLinux/CentOS 操作系统驱动的专用服务器上的 3proxy 配置。3proxy 是最相关和功能最强大的工具之一。它支持各种类型的协议:HTTP、HTTPS、FTP、SOCKS 等。它将帮助您在几分钟内设置自己的代理服务器。
本文包含实用程序安装及其后续配置的分步指南。文章探讨了从官方来源安装、设置配置文件、开放非标准端口等问题,并描述了常见错误以及相应的实用解决方法。启动前,您必须订购一台搭载 CentOS 或 ArchLinux 操作系统的VPS或独立服务器。示例中的所有操作都将在一台搭载 CentOS 7 操作系统并拥有一个独立静态公网 IP 地址的独立服务器上执行。
安装
第四步
3proxy 直接从源代码安装。编译器将使用gcc 。我们以 root(超级用户)身份连接到服务器并安装编译器。
yum install gcc第四步
现在需要下载 3proxy 的源代码文件。您可以访问官方网站,复制最新版本的链接来完成此操作:
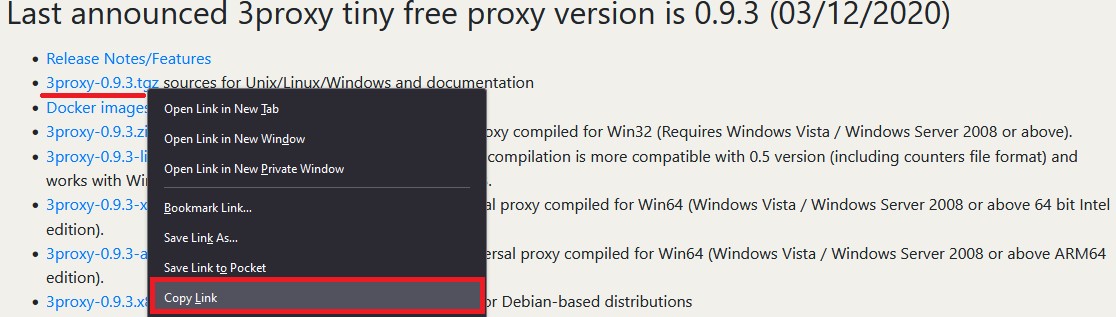
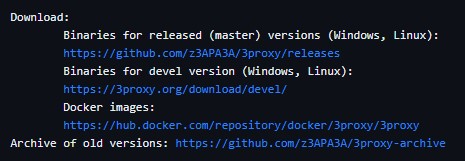
在撰写本文时,当前版本为 0.9.3。下载并立即解压:
wget https://github.com/z3APA3A/3proxy/archive/0.9.3.tar.gz
tar -xvzf 0.9.3.tar.gz
第四步
进入解压后的项目目录并进行编译:
cd 3proxy-0.9.3/
make -f Makefile.Linux
第四步
我们创建目录并将 3proxy 文件复制到 /usr/bin:
mkdir -p /var/log/3proxy
mkdir /etc/3proxy
cp bin/3proxy /usr/bin/
第四步
我们创建一个用户来操作目录。在本例中,用户名是3proxyuser:
useradd -s /usr/sbin/nologin -U -M -r 3proxyuser我们授予创建的用户使用目录的权限:
chown -R 3proxyuser:3proxyuser /etc/3proxy
chown -R 3proxyuser:3proxyuser /var/log/3proxy
chown -R 3proxyuser:3proxyuser /usr/bin/3proxy
现在让我们使用以下命令创建一个配置文件:
touch /etc/3proxy/3proxy.cfg如有必要,您可以为 root 用户设置配置文件权限。此步骤并非强制性,但可以增加安全性:
chmod 600 /etc/3proxy/3proxy.cfg3代理配置
第四步
需要正确填写之前创建的配置文件。首先,通过以下命令找出用户的uid和gid:
id 3proxyuser在我们的例子中,这些是以下值:

要填写配置文件,您可以直接使用现成的配置,也可以参考官方网站上的文档。此外,默认情况下已预装一个示例文件,您可以在以下路径找到它:/cfg/3proxy.cfg.sample
例如,我们将考虑两种配置:带日志记录的配置和不带日志记录的配置。每一行都会附有注释(用“#”符号标记)。
这是一个不带日志记录的现成配置示例:
# We specify the user's data that we found out in the previous command
setgid 995
setuid 997

# Type the NS-servers. It is possible to clarify your own servers at /etc/resolv.conf
nserver 1.1.1.1
nserver 8.8.8.8

# Cache size
nscache 65536

# Timeouts
timeouts 1 5 30 60 180 1800 15 60

# Authorization of users by login/password (if required). You may not to use it or specify the path to the file in which authorization data is stored, for example, users $/etc/3proxy/.authfile

# If you insert a password in md5 format, replace “CL” with “CR”, as indicated in the example. You can use 2 methods at the same time.
auth cache strong
users "userproxy:CL:passwordproxy"
users "userproxy2:CR:b89097a7ad0b94f13b3c313ae76699d4 "

# Launch mode. Daemon only.
Daemon

# We write the port through which the http connection will take place. The example shows the standard one. To establish a socks connection, use the command specified in the second line, the port is also standard.
proxy -p3128
socks -p1080
我们之前考虑过不使用日志记录的配置文件方案。现在我们将创建一个包含日志记录和用户授权功能的配置文件;该文件将在服务器设置过程中使用。
请务必提供授权信息,因为即使在非标准端口上也能检测到服务器。
# Configuring the server to launch from the userproxy user and the passwordproxy password.
users userproxy:CL:passwordproxy

# Specify the user's uid and gid
setgid 995
setuid 997

# Nameservers (NS-servers)
nserver 1.1.1.1
nserver 8.8.8.8

# Timeouts
timeouts 1 5 30 60 180 1800 15 60

# Cache size (standard)
nscache 65536

# Indicate the launch mode
daemon

# We install http proxy on a non-standard 50001 port. If there are several IP addresses on the server, be sure to specify a specific address for connecting the network. For example, "-e91.150.32.146". The argument "i" is a local address.
proxy –p50001

# In a same way as socks proxy, we conduct the installation on a 50002 port.
socks –p50002

# Path to the directory with logs, logs format and proxy rotation
Log /var/log/3proxy/3proxy.log D
logformat "- +_L%t.%. %N.%p %E %U %C:%c %R:%r %O %I %h %T"
rotate 30
这样就完成了主配置文件的设置。我们进入最后阶段并启动。
第四步
为 systemd 创建初始化文件:
touch /etc/systemd/system/3proxy.service颁发必要的权利:
chmod 664 /etc/systemd/system/3proxy.service将以下值复制并粘贴到文件中并保存:
[Unit]
Description=3proxy Proxy Server
After=network.target
[Service]
Type=simple
ExecStart=/usr/bin/3proxy /etc/3proxy/3proxy.cfg
ExecStop=/bin/kill `/usr/bin/pgrep 3proxyuser`
RemainAfterExit=yes
Restart=on-failure
[Install]
WantedBy=multi-user.target»请注意:在“ExecStop”值中,您必须指定在步骤 5 中创建的用户名。
之后您需要使用以下命令更新守护进程配置:
systemctl daemon-reload第四步
我们唯一需要做的就是启动配置的 3proxy,将其添加到自动启动,并在防火墙中打开端口。
将其添加到自动启动、启动和检查状态:
systemctl enable 3proxy
systemctl start 3proxy
systemctl status 3proxy
检查状态后,我们看到3proxy已经启动成功的信息:
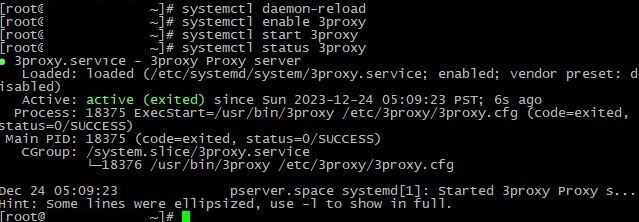
剩下唯一要做的事情就是打开端口:
firewall-cmd --zone=public --add-port=50001/tcp
firewall-cmd --zone=public --add-port=50002/tcp
firewall-cmd –reload
如有必要,请重新启动服务器。可以使用以下命令检查端口是否打开:
firewall-cmd --list-all应该是:
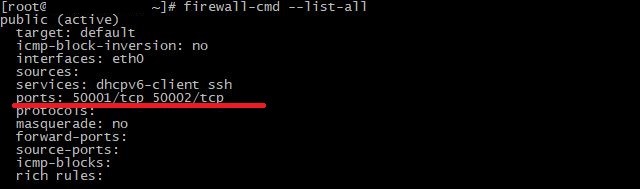
我们可以看到,两个端口都已成功打开并正在监听。http 连接在第一个端口上,socks 在第二个端口上。
通过任何便捷的服务检查连接:

一切运行正常。我们不建议在未进行登录/密码验证的情况下使用不安全的连接,也不建议使用标准端口。在配置配置文件时,请务必指定登录名并创建复杂密码,同时将端口更改为非标准端口。在特殊情况下,可以使用 IP 地址验证。
常见问题
出了点问题,代理无法正常工作?可能是 3proxy 配置不正确。让我们考虑一下在安装和配置实用程序期间最常见的问题及其解决方案。
没有关联
对于许多用户来说,最常见的问题是配置文件似乎配置正确时无法访问连接。如果您确定所有设置都已正确配置,托管服务提供商不会限制所选端口,并且所有数据都表明服务正常运行,则问题可能出在防火墙上,或者更准确地说,是其配置不正确。例如,系统上可能安装了两个以上的程序,它们会相互冲突。要解决这个问题,使用一个特定的防火墙就足够了。我们建议您只选择 iptables 或firewall-cmd。
服务未启动
完成所有必要的配置文件设置后,服务仍然无法启动。这可能是由于遗漏了某个配置步骤、未授予相应的权限,或者配置文件中存在细微错误造成的。我们建议您再次仔细阅读并逐一检查配置说明,或许您遗漏了某个步骤。如果问题仍然存在,建议您重新安装操作系统,并从头开始重新配置。我们建议您使用位于 /cfg/3proxy.cfg.sample 的示例文件作为测试配置,并使用预装的firewall-cmd作为防火墙。
记录
最后但同样重要的问题与文件存储有关。3proxy 在安装过程中占用几 MB,但随着时间的推移,仅通过日志记录,大小就会显著增加。事实上,许多用户在单独的文件中启用日志记录,但没有设置轮换,也没有删除不相关的日志。可以使用三种选项来解决此问题:
- 启用日志记录;
- 定期删除不相关的日志;
- 启用轮换,如上面的配置中所述。例如,配置文件中的“rotate 30”表示 3proxy 将仅存储最新的 30 个文件。
结语
在 CentOS 和 ArchLinux 操作系统上安装和配置 3proxy 是一项相当简单但同时又很有效的任务。本文介绍了安装必要软件包、配置配置文件和启动服务的步骤。获得的知识将使您能够自己安装和配置代理服务器,而不会遇到任何困难。